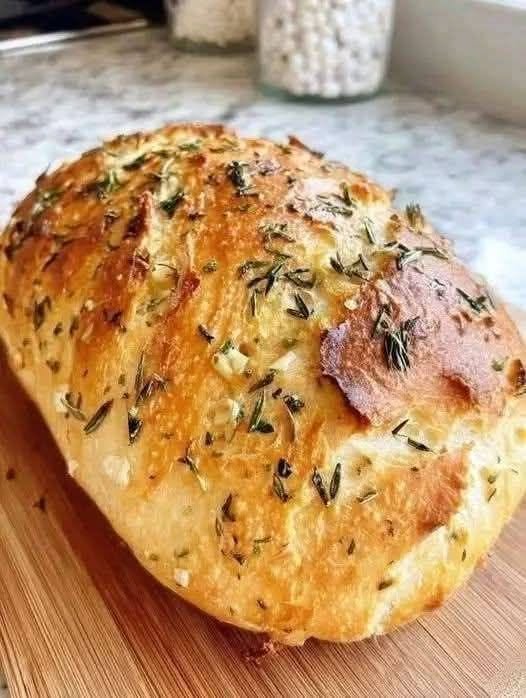
 Rustic No-Knead Rosemary Garlic Bread
 Introduction
Few things feel as satisfying as baking your own bread, especially when it requires minimal effort. This rustic no-knead rosemary garlic bread is perfect for beginners and seasoned bakers alike. With a long fermentation and simple ingredients, you’ll get bakery-quality bread with deep flavor, a crispy crust, and a soft, airy crumb infused with garlic and fragrant rosemary.
 Nutritional Information (Approx. per slice)
- Calories: 150–180 kcal
- Carbohydrates: 28g
- Protein: 4–5g
- Fat: 2–3g
- Fiber: 1–2g
- Sodium: 200–300mg
Note: Values vary depending on portion size and added oil.
 Ingredients
Basic Dough
- 3 cups (375g) all-purpose flour
- 1 ½ tsp salt
- ½ tsp instant yeast
- 1 ½ cups (360ml) warm water
Flavor Additions
- 3–4 cloves garlic (minced)
- 1 ½ tbsp fresh rosemary (or 1 tbsp dried)
- 1 tbsp olive oil (optional, for richness)
For Baking
- Extra flour (for dusting)
- Cornmeal or parchment paper
 Instructions
Step 1: Mix the Dough
In a large bowl:
- Combine flour, salt, and yeast
- Add water and mix until a sticky dough forms
- Fold in garlic and rosemary
 No kneading needed—just mix until combined.
Step 2: First Rise (Fermentation)
- Cover the bowl with plastic wrap or cloth
- Let it rest at room temperature for 12–18 hours
 Dough is ready when bubbly and doubled in size
Step 3: Shape the Dough
- Lightly flour your surface
- Gently turn out the dough
- Fold it over itself 2–3 times
- Shape into a rough ball
Let it rest for 30–60 minutes
Step 4: Preheat Oven
- Place a heavy pot (Dutch oven) inside oven
- Preheat to 230°C (450°F) for at least 30 minutes
Step 5: Bake
- Carefully place dough into hot pot
- Cover with lid and bake 30 minutes
- Remove lid and bake another 10–15 minutes until golden brown
Step 6: Cool
- Let bread cool for at least 1 hour before slicing
 Methods & Tips
No-Knead Technique
This method relies on time instead of kneading to develop gluten. The long fermentation creates structure and flavor naturally.
Steam Baking
Using a covered pot traps steam, creating that crispy artisan crust.
Flavor Enhancements
- Add olives or sun-dried tomatoes
- Sprinkle sea salt on top before baking
- Brush with olive oil after baking for shine
 History
No-knead bread became widely popular after being popularized by baker Jim Lahey in the early 2000s. The method revolutionized home baking by proving that excellent bread doesn’t require intensive kneading—just patience and simple ingredients.
Rustic breads like this trace back to traditional European peasant baking, where slow fermentation was the norm due to limited resources.
 Formation (How It Works)
- Yeast fermentation produces gas → airy texture
- Gluten formation happens naturally over time
- Steam + heat create a crisp crust
- Garlic and rosemary infuse oils into the dough, enhancing aroma and taste
NEXT PAGE…
For Complete Cooking STEPS Please Head On Over To Next Page Or Open button (>)
Chef’s Clever Hack for Perfectly Peeled Hard-Boiled Eggs

Meat Is Not as Delicious as Cabbage
Creamy Mushroom Soup

Portuguese Linguiça and Cabbage Soup

Crunchy Chicken Taco Salad